Mother’s Day 2016 Raised Bed Planter
Raised Bed Planter
 Planning
Chelsea expressed a desire for a lower, yet wider, planter bed for a new vegetable garden for this year. She was happy with the beds I built her last year, but confessed they were too small for the amount of vegetables she wanted to plant. After much discussion, we decided that the side of the garage was the appropriate place for the bed, as it got sun throughout most of the day (even through the trees); additionally, the siding on the garage would help reflect even more light and heat to the new garden.
Plans inspired by this Family Handyman’s article.
Materials
- 1 cubic yard of drainage rock (actually used closer to 0.75 cu.yd)
- 3 cubic yards of blended garden soil (actually used about 2½ cu.yd)
- Garden edging
- (8) 2″x6″x10′ P.T.
- (5) 2″x4″x8′ P.T.
- (2) 5/4″x6″x10′ P.T. decking board
- (1) 5/4″x6″x8′ P.T. decking board
- (2) 8′ Landscaping timbers
- Landscaping fabric
- Hardware cloth
- Thick plastic sheeting (I used 3.5mil, folded over)
- Decking Screws (2½”)
- Optional (for self-watering)
- 3″ or 4″ flexible perforated pipe, 25′ long
- Pipe sock for the perforated pipe
- 4″ pipe caps (to fit ends of perf pipe)
- Various pipes for fill/overflow tube. I used ¾” pipes, with a tee for the overflow drain
 Preparation
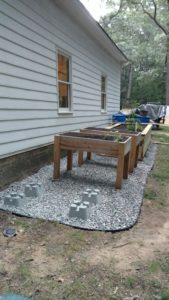
I decided that I wanted to fully prepare the ground instead of leaving it “raw”, as it were. There were many weeds and old plants from the previous flower gardens located there, so I wanted a fresh start. I also wanted to make the area easier to stand on and walk around, so I chose to cover the area with drainage rock. This gave me the added benefit of enhancing drainage in the area, which allowed me to basically sit the new planter on the “ground”, but still allows for easy drainage. I marked out a roughly 7’x16′ area, starting at the very rear of the garage and extending to the front. After slicing the sod at the lines, I shoveled out the top 3″ or so of the old garden mulch/soil matter. Because the house’s foundation has been treated for termites, I cannot use this soil for any other purpose; as a result it all got dumped in a far corner of our property.
I then put down landscaping fabric, and put the halved landscaping timbers in place. Finally, I put in the edging, and shoveled the rock into place! There’s little that compares to the feeling you get after you realize you just shoveled about 3,000 pounds of rock!
Assembly
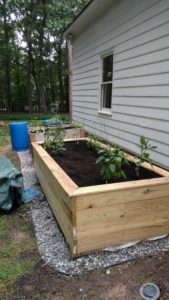
Assembly was pretty quick, as there were minimal cuts (by design), and all joints were butt joints. I wasn’t going for fine-woodworking appearances here, but rather functionality. Probably the hardest part was manhandling the long side pieces from the driveway to the side of the house! The bottom was left open for drainage (but gets covered with hardware cloth and landscaping fabric to contain the soil). I also applied a thick plastic (doubled up 3.5 mil plastic sheeting) to all exposed wood on the inside of the planter. This is to keep the chemicals in the pressure treated wood from leaching into the soil.
I chose to add a self-watering assembly, which means I put in a layer of soil on the bottom to start. I then fully extended the perforated pipe, and snaked it in a single layer around the top of that soil layer. I drilled a hole in one end of that perforated pipe, and inserted the PVC pipe into it. I made sure to cut a sharp angle on the PVC end that went into the perforated pipe, to maximize the water flow. Note: the overflow drain needs to be above the highest point of the perforated pipe!
Now comes the most tedious part: shoveling nearly three cubic yards of blended soil mix from the trailer into the planter box!
Finally, I capped off the sides with the 6″ decking boards, this time using 45° mitered corners for appearance’s sake. I also overlapped the outside ends by the thickness of the decking board, in case I ever want to “finish” the outside corners with additional decking boards.
Summary
Started: May 15, 2016 (Mother’s Day)
Completed: May 21, 2016
Leave a Reply